
MODULE TWO: LESSON ONE
SETTING YOUR BRAND COLORS
Let’s Bring Your Palette to Life
You’ve already done the work of choosing your brand colors. now it’s time to bring them into your site. This step sets the visual tone for your entire website and ensures consistency across every page.
In this lesson, we’ll walk through exactly where and how to plug in your brand colors inside Squarespace using the Site Styles panel.
Where to Add Your Colors in Squarespace
Your website’s color palette is one of the most powerful ways to create a consistent, memorable brand experience for your readers.
If you’re keeping the color palette that came with your template, you can skip this step and move on to the next lesson since your colors are already set up for you.
But if you’d like to use your own brand colors, here’s how to update them:
Gather Your Hex Codes: Make sure you have the HEX codes (for example, #C1A57B) for each of your chosen brand colors. If you don’t know them yet, go back to the previous module to learn how to do this.
Log in to your Squarespace site
From the left-hand menu, click website → Styles

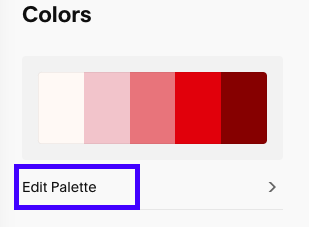
2. Click into Colors

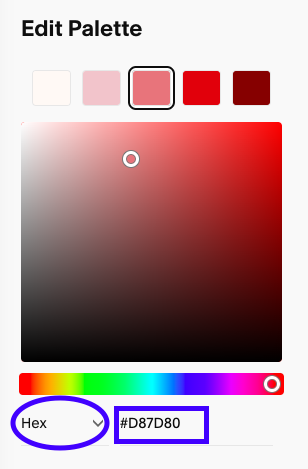
3. Click Edit Palette
4. Make sure you’ve selected “hex” and enter each of the hex codes into the 5 color palette options.
CLICK SAVE AND YOUR COLOR PALETTE IS GOOD TO GO!
Tips While You’re Editing
Preview sections of your site as you go to see where each color shows up
If you’re unsure which slot changes what, try adjusting one at a time and watching the preview
Don’t be afraid to test different combinations — everything is easy to tweak
Action StepS
Open Site Styles → Colors
If needed, paste in your hex codes to match your brand palette
Preview your homepage and adjust as needed.