
MODULE TWO: LESSON THREE
Uploading photos & graphics into the asset library
Before adding images or graphics to your site, it’s best to upload them to your Squarespace Asset Library. This keeps all your files organized and easily accessible whenever you want to add them to any page or block.
How to Upload to Your Asset Library
In the Squarespace editor, go to the Main Menu (top left corner).
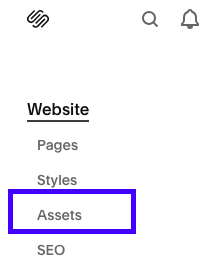
Click on website.
Scroll down and select assets (this is your Asset Library where all uploaded files are stored).
2.Click the Upload File button.

Select your images, banners, or other graphics from your computer.
Upload as many files as you need — all your files will appear in this list.
Using Your Uploaded Files
Once uploaded, these files can be added anywhere on your site by choosing Image or other blocks and selecting the file from your Asset Library.
Uploading to the Asset Library first helps Squarespace manage your files efficiently and speeds up the process when building or editing pages.
Tips for File Management
Use clear, descriptive file names (e.g., homepage-banner.png or author-photo.jpg) so you can quickly find what you need later.
Keep your graphics organized locally on your computer too, so reuploads or edits are easy to manage.
When replacing files, upload the new version with a clear file name to avoid confusion.
action steps
Open assets in your Squarespace dashboard.
Upload all your images and Canva graphics for your site.
Practice inserting one of these files into an image or button block on any page.